Creating HID Override Layouts for the Unity Input System
Unity's new(ish) Input System is a quantum leap from their old Input Manager system. You can re-bind controls, axes, and buttons from various devices with relative ease. You can broadcast events from devices and handle those events inside your unity C# scripts very easily. It is, in my estimation, a good system. It's young code, and it comes with its own set of quirks as a consequence, but the documentation is complete, if a little obfuscated by overly complex examples.
Yesterday I was able to get the Input System up and running with my HOTAS. Dapper Dino did an excellent video tutorial on YouTube. If you haven't gotten up and running with Input System yet, I strongly suggest you start here:
Now, I'm the kind of engineer who likes clean and simple documentation and code samples. I'm definitely guilty of skimming long documentation and missing important pieces of information. Everything I needed was in front of me, credit to Unity absolutely for doing a A job on their documentation here. But I'm the kind of Engineer who needs an A+ document, otherwise I just go into troubleshooting mode.
Gist of my HID Device Detector


Yesterday I was able to get the Input System up and running with my HOTAS. Dapper Dino did an excellent video tutorial on YouTube. If you haven't gotten up and running with Input System yet, I strongly suggest you start here:
So I was pretty pleased with myself, after porting most of the input in my project to the new system. However when I went to add yaw controls to my spaceship, there was a problem; Unity didn't detect my rudder pedals. Alright then, time to dig into the Input System documentation.
Now, I'm the kind of engineer who likes clean and simple documentation and code samples. I'm definitely guilty of skimming long documentation and missing important pieces of information. Everything I needed was in front of me, credit to Unity absolutely for doing a A job on their documentation here. But I'm the kind of Engineer who needs an A+ document, otherwise I just go into troubleshooting mode.
So, without further adieu, I'm going to break down the layout process into as simple a step-by-step process as possible.
Assumptions & Key Info
This was done on Unity 2020.1.0f1 Personal. I'm assuming you have an HID device that is not properly detected by Unity. That is to say, it's showing up in the list of 'unsupported' devices in the Input System debugger. Finally, I'm assuming you have a background in software engineering at an intermediate level, and are somewhat familiar with C#.
The Input System debugger is located right in Unity:
'Window' -> 'Analysis' -> 'Input Debugger'
The Input System debugger is located right in Unity:
'Window' -> 'Analysis' -> 'Input Debugger'
Register Your HID Device With Unity
In the Input Debugger, you'll be able to right click your 'unsupported' device, and copy the JSON HID description of the device. Mine looked like this: Note the product ID and the vendor ID. You'll want to convert these to hex, and put them in to your version of the code below.
Using the attributes ahead of the 'SaitekFlightProRudders' class, note that there are some attributes that define the controller layout described in the struct above. The simple struct is just a placeholder, such that we can get unity detecting input from the device. We'll write the actual layout later on.
Once you save your C# file, Unity will pick it up. Now if you visit the Input Debugger, you should see it reading input from your device.
 Regardless, we have input being read to Unity, we're in good shape. Next step is to map that input to our HID layout report (the struct described in the GIST snippet).

Using the attributes ahead of the 'SaitekFlightProRudders' class, note that there are some attributes that define the controller layout described in the struct above. The simple struct is just a placeholder, such that we can get unity detecting input from the device. We'll write the actual layout later on.
Once you save your C# file, Unity will pick it up. Now if you visit the Input Debugger, you should see it reading input from your device.

And if we dive in to the debugger, when I move my pedals I can see input events being read by the Input System. Note that some kinds of input devices seem to be giving constant input to the system, regardless of human input, like my Warthog HOTAS. I'm assuming that's some kind of polling or heartbeat, or the hal-effect sensor is perhaps a little more sensitive, and the stick is not perfectly zeroed.

Gist of my HID Device Detector
Laying out the Device
Now my rudders have several axes. One for the yaw, left/right movement, and one for each toe brake, left and right. Looking at the raw memory in the unity debugger (double click on an event, select 'Display Raw Memory'), we can see 3 bytes of memory. Stands to reason then that 3 axes & 3 bytes, means one byte per axis. Right? WRONG.
I'll save you all the head scratching I did about controller types and wondering if it's a vector 3 or a quaternion. It's none of those things. Turns out the lovely engineers at saitek were just mashing the information into as few bytes as possible.
Now, Unity's in-house debugger for HID is okay, but it has a limitation as to showing you everything in hex, and none of it is live. This has the unfortunate side effect of hiding the clever bitwise work that was going on with these pedals. So, time to get some better debugging tools for HID.
I came across this little gem:

Remember the vendor and product ID we converted to hex from earlier? Well, plug that in to the send receive comm box, along with the correct syntax. Press the play button, and it's now giving you binary output from your device. Cool!
I used the binary tab, because once I could see what was going on when I added control input, it was apparent what was happening.
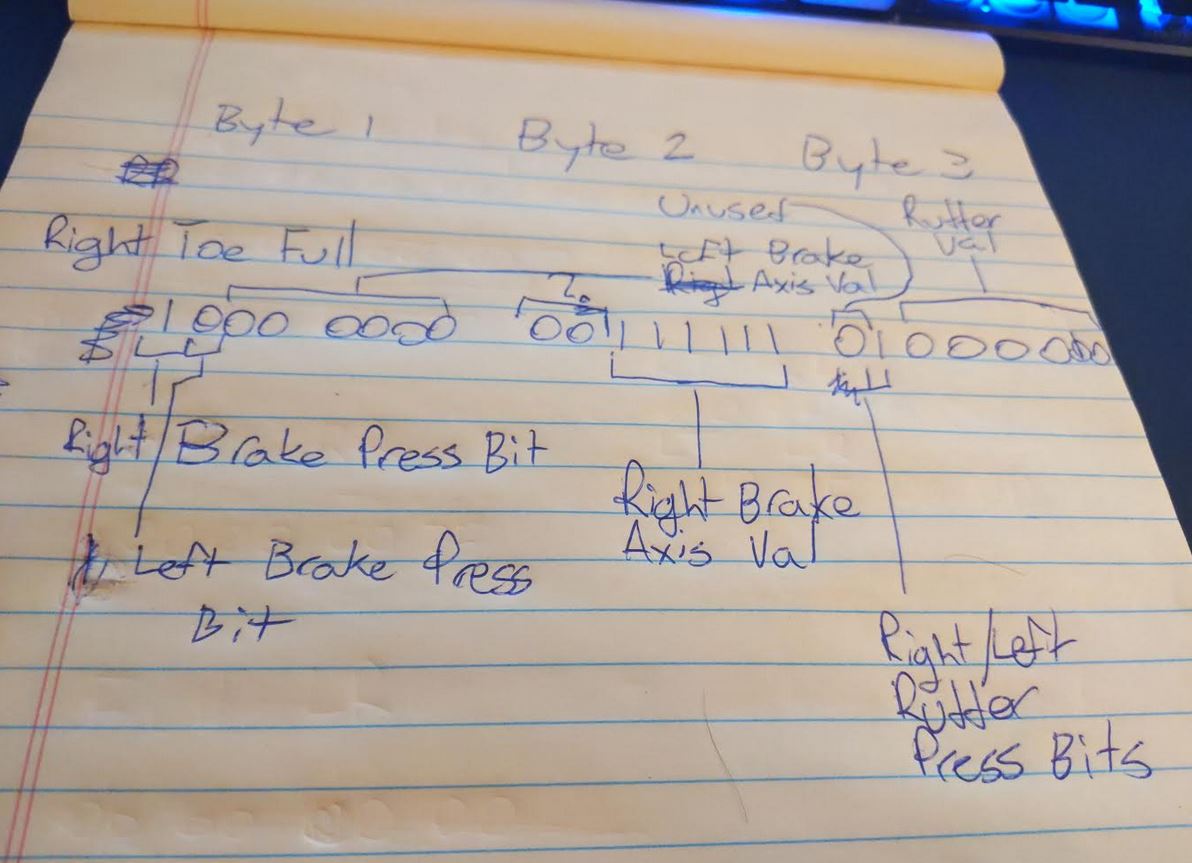
In my case, the 6 least significant bits of the first two numbers were the toe brake axes, and the two most significant bits on the first byte were left and right brake press bits. The two most significant bits on the second byte are a bit of a mystery. The 7 least significant bits on the third bute is the rudder axis, and the most significant bit on the third number is unused.
If that's too much of a mouthful, here's the diagram I made:
I used the binary tab, because once I could see what was going on when I added control input, it was apparent what was happening.
In my case, the 6 least significant bits of the first two numbers were the toe brake axes, and the two most significant bits on the first byte were left and right brake press bits. The two most significant bits on the second byte are a bit of a mystery. The 7 least significant bits on the third bute is the rudder axis, and the most significant bit on the third number is unused.
If that's too much of a mouthful, here's the diagram I made:
Phew. Okay time to put this structure into the Unity layout.
Now that that's in, go back to your device debugger, if you've laid out the bits properly, you will see the input as expected. In my case, a button press for each toebrake, and an axis for each of the toe brakes and yaw. Below is a screenshot with me pressing the right toe-brake, with the rudders in a middle position, input as expected!

Of course, following my steps exactly will only help you if you happen to have my exact set of rudders. But it's my hope that this will help others do HID layouts in Unity. Please take a moment to comment below if you have questions, or if this helped you.


hi,i just wanna say,good job. and can you specifies where is unity layout that i can put structures into it?
ReplyDeleteWatch the video at the beginning of the blog post friend :)
DeleteHi! Have you tried to write to the device?
ReplyDeleteMy device was an output device, so, no I hadn't! This system is specifically trying to read output into Unity. If you're trying to write to an output device, that'd be another ball of wax.
Delete